Adding a photocopier to your PC with Locked printing.
This only needs to be done once, on your PC.
1. If your PC has Windows 7 on it, click Start, type \\kellystown in the “Search programs and files” box and hit return.
2. A list of printers & photocopiers should appear. Scroll down to the photocopiers in your department e.g.
- Business: D1022-CP1 and D1022-CP2, BUSINESS_NRG1_LOCKED,
- BUSINESS_NRG2_LOCKED, BUSINESS-ADMIN-LOCKED.
- Engineering: Engineer_CP1 and Engineering_CP2.
- Science: B2215-CP1 and B2215-CP2.
3. Double click your department’s photocopier to add it to your PC.
4. Now you should be able to print to them from Word etc.
Printing to the photocopiers
Most of the photocopiers will print your file as soon as you click the Print button on your PC. Some of the photocopiers have “Locked printing” enabled. So when you print confidential files to them, it won’t just print them out in the middle of somebody else’s photocopying job. You have to to go to the photocopier and enter your unique code before it will start to print.
-
1. From Word etc. click File \ Print.
2. Choose your departments photocopier from the list.
3. Click OK.
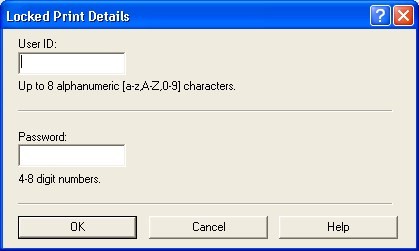
The screen below will popup:
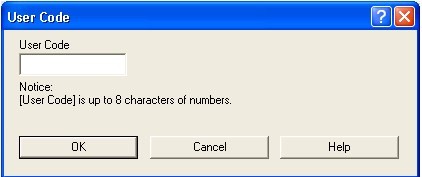
If you get a screen with 1 box called “User Code” instead of this one, please see issue 1 in the FAQ at the bottom. If the print job goes directly to the photocopier and no pop-up appears at all, see issue 1 also.
5. In the “User ID:” box enter your name / nickname e.g. JoeBlogg (8 letters max).
In the Password, make up a password for this print job and type it in e.g. 9876.
Click OK.
6. If this User Code screen appears, do not change or enter a User Code. Just click OK to it:
7. The file is now sent to the photocopier but it will not print out until you do the following:
At the photocopier, press the Printer button (3rd big button down the LHS of the touchscreen).
8. On the touchscreen press “Locked Jobs” and the list of files waiting to be printed will appear.
Your job will have “JoeBlogg” or the name entered in step 5 beside it.
9. Press the “Print” button on the touchscreen.
10. You will then be asked for the password that you set in step 5.
After entering your password the file will print.
If you have any trouble adding the photocopier as a printer, or printing to it, please log a request on www.itsligo.ie – Staff – IT Services – Helpdesk.
FAQ
Issue 1
Screen with 1 box called “User Code” appears instead of screen with 2 boxes.
On some PCs with certain drivers installed, the “Locked Print Details” screen with 2 boxes in step 4 may not appear. Instead the “User Code” screen with 1 box appears, or the print job may go directly to the photocopier.
To fix that issue:
A. Restart your PC.
B. Click Start \ Devices and Printers (if your PC has Windows 7)
C. Right click the photocopier with the issue, and choose “Remove Device” or “Delete”.
D. Repeat the 4 steps in “Adding a photocopier to your PC” at the top of this document.
E. Now when you print to it the “Locked Print Details” screen with the 2 boxes should appear.
Issue 2
Some photocopiers do not give a “Locked print details” popup after printing your file from Word etc.
The Ricoh Aficio MP 6000 & 7500 that are setup for locked printing will give the “Locked print details” popup screen in step 4 above, but some photocopier e.g. Ricoh Aficio 2045e (e.g. regpcopier2) do not have this feature. You can still use locked printing on that photocopier model, without the popup screen, if you follow these steps: You only need to do this once on your PC.
A. Click Start \ Devices and Printers (if your PC has Windows 7).
B. Right click the Reg-pcopier2 (Ricoh Aficio 2045e) photocopier with the issue, and choose “Printing Preferences” (not “Properties).
C. In the “Setup” tab, the “Job Type: “ box is set to Normal.
Change it to “Locked Print” as below:
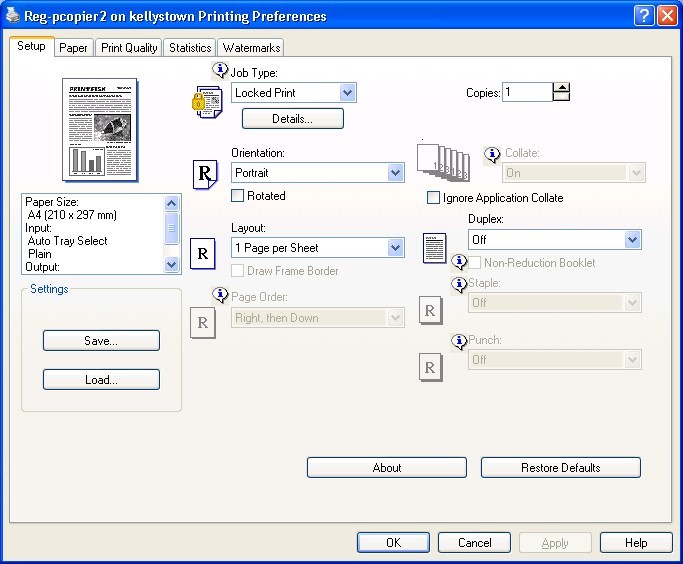
D. Click the “Details” button which is beneath the “Job Type” box, and enter a name and password for all of your print jobs. Click OK.
E. Now when you print to that photocopier, no popup screen will appear, but your job will be waiting at the photocopier for you to choose from the list and enter your code before it prints, as in step 7 above.